Import Data into Autonomous DB@Azure using Blob storage
Introduction
This guide shows how to use Data Pump to migrate and import data into Autonomous Database@Azure using Azure Blob storage as transfer medium.
Objectives
In this guide we will cover the following objectives in detail:
- Deploy the target Autonomous Database@Azure
- Blob storage setup and configuration
- Migration/Data Import with Data Pump
- Data Pump import using
impdp - Alternative: Data Pump import using
DBMS_DATAPUMP
- Data Pump import using
Prerequisites
- Data Pump export file from the source database
- Compute instance with access to the Autonomous Database
- Azure user with permissions to create an Autonomous Database instance and the storage container
Network
We already have configured a virtual network with 2 subnets:
- Subnet for the ADB
- Subnet for other resources like compute
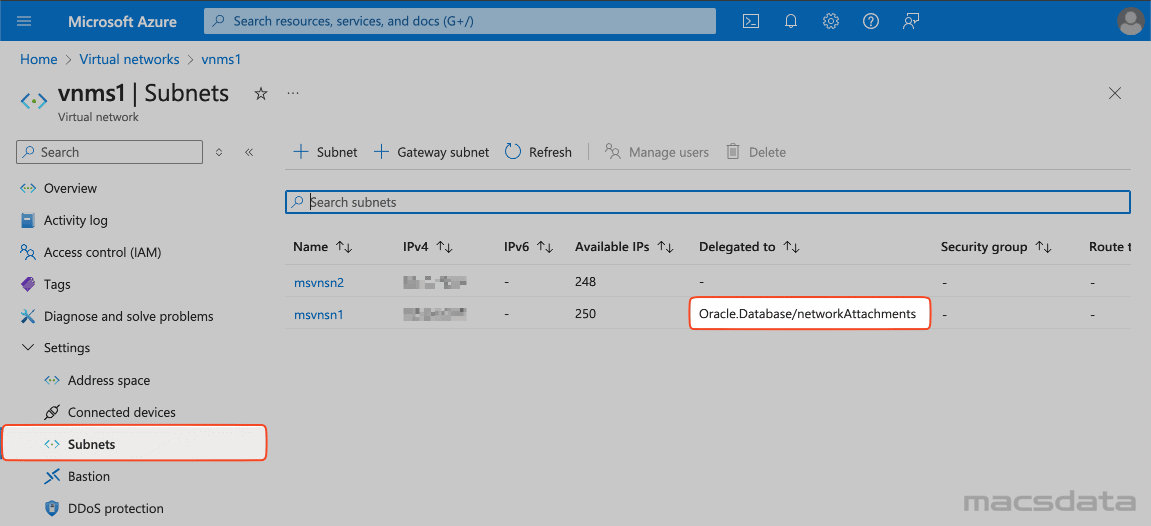
The subnet that will be used for the Autonomous Database needs to be delegated to Oracle.Database/networkAttachments
Only delegated subnets are available as a deployment option during the ADB provisioning.
To check if a subnet is delegated open the virtual network in Azure:
- Click on Settings
- Select Subnets
- Check the Delegated to column in the list of the available subnets.
To set or change the delegation:
- Click on the subnet to open the Edit subnet page
- Scroll down to Subnet Delegation

Restrictions
Currently the Azure storage account needs to be created to allow public access from all networks. (You still need a username and password to access the actual files but the access it not limited to a specific IP or subnet)
We will set this option later when provisioning the storage account.
Environment Setup
In this chapter we will create the Autonomous Database@Azure target database and the Blob storage to import the data.
Target Database
These are the steps to provision the Autonomous Database target database:
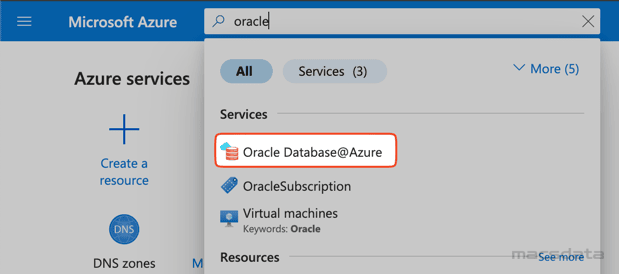
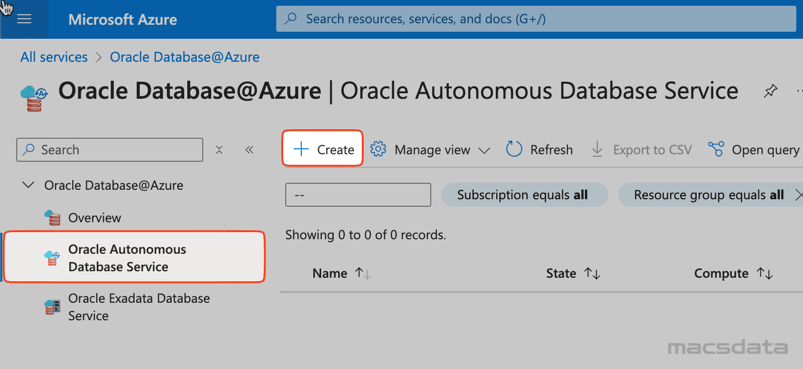
After login to Azure navigate to the Oracle Database@Azure Service:
- Option 1: Enter
oraclein the search field and select the service
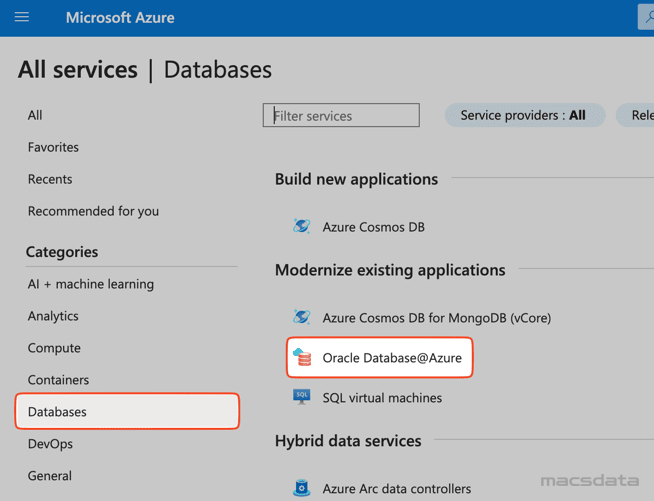
- Option 2: Click on the menu button on the top left
- Select All services
- Select Database and Oracle Database@Azure

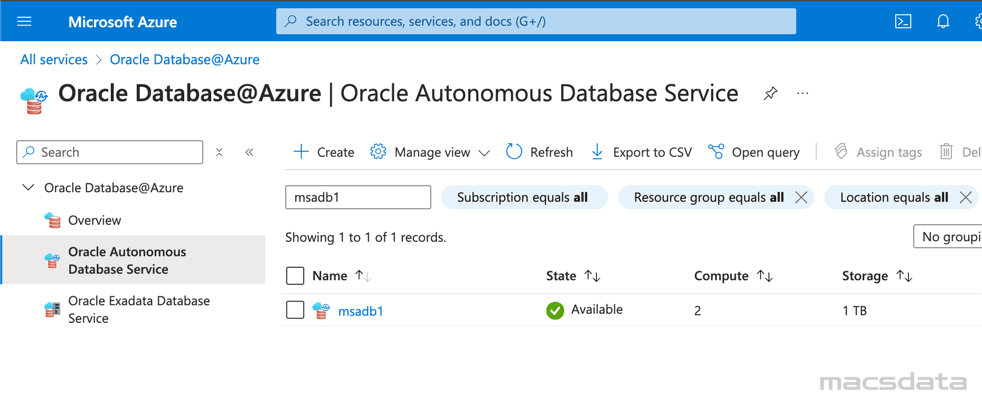
- We can now see the Oracle Database@Azure Overview Page:
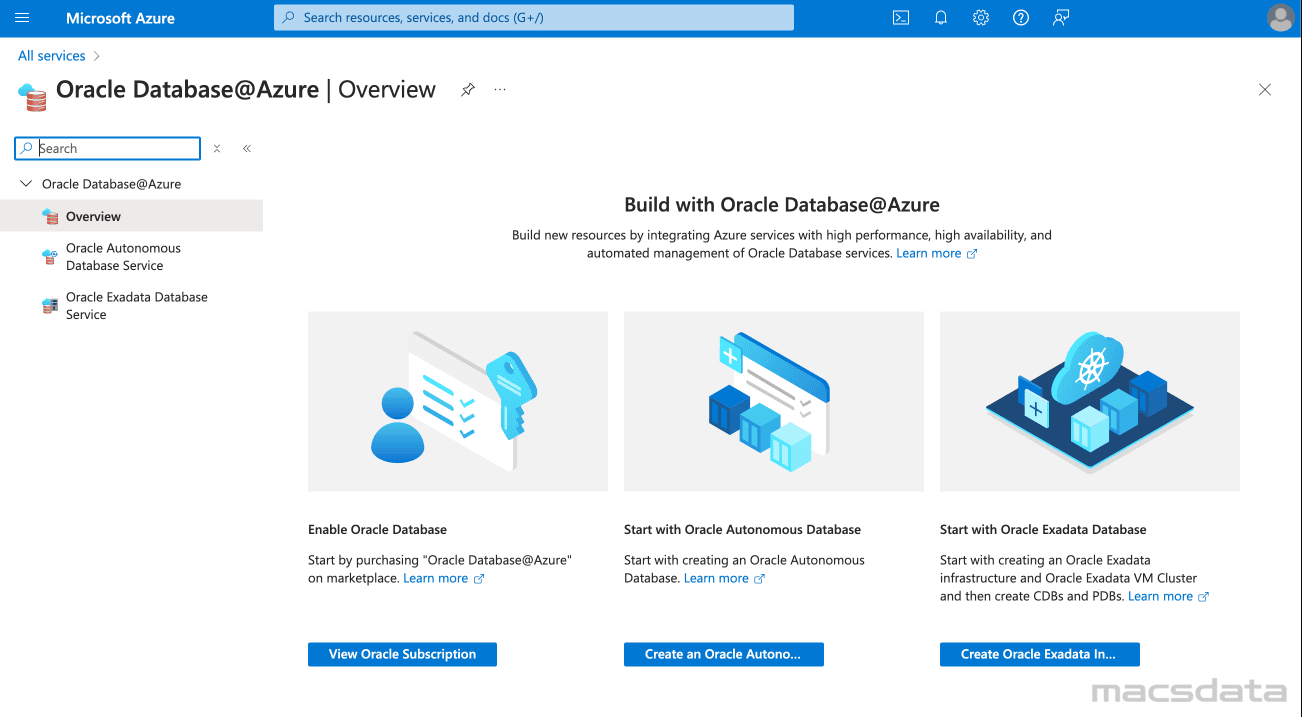
- Click on Oracle Autonomous Database Service and then Create
-
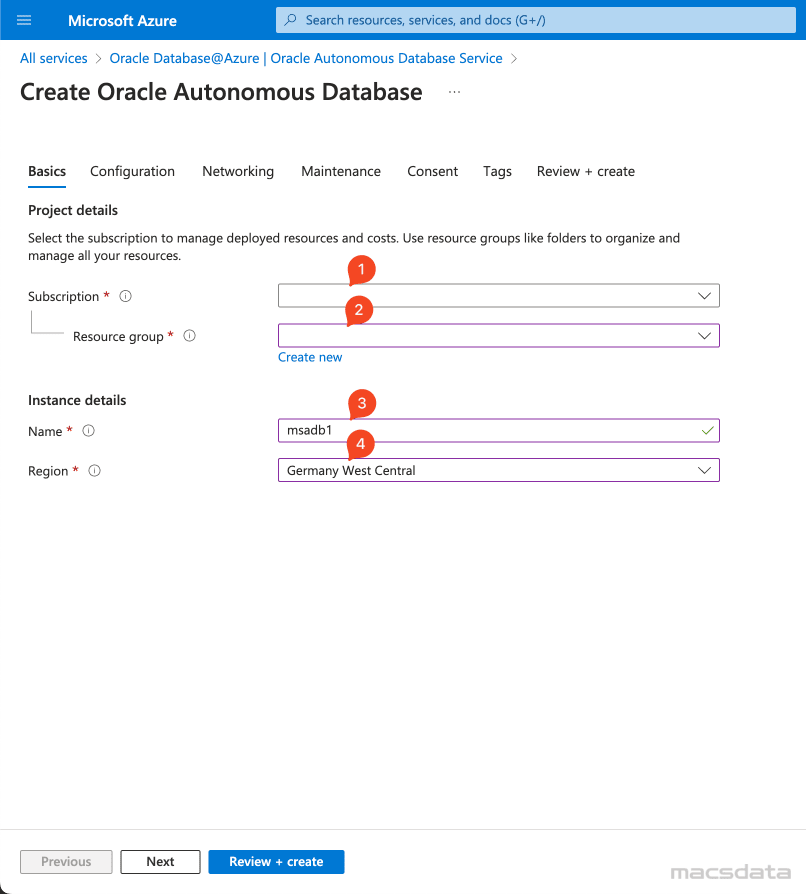
Enter the required information under Basics:
1. Select your Subscription
2. Select the Resource group
3. Enter the Name of the Autonomous Database
4. Select the Region
-
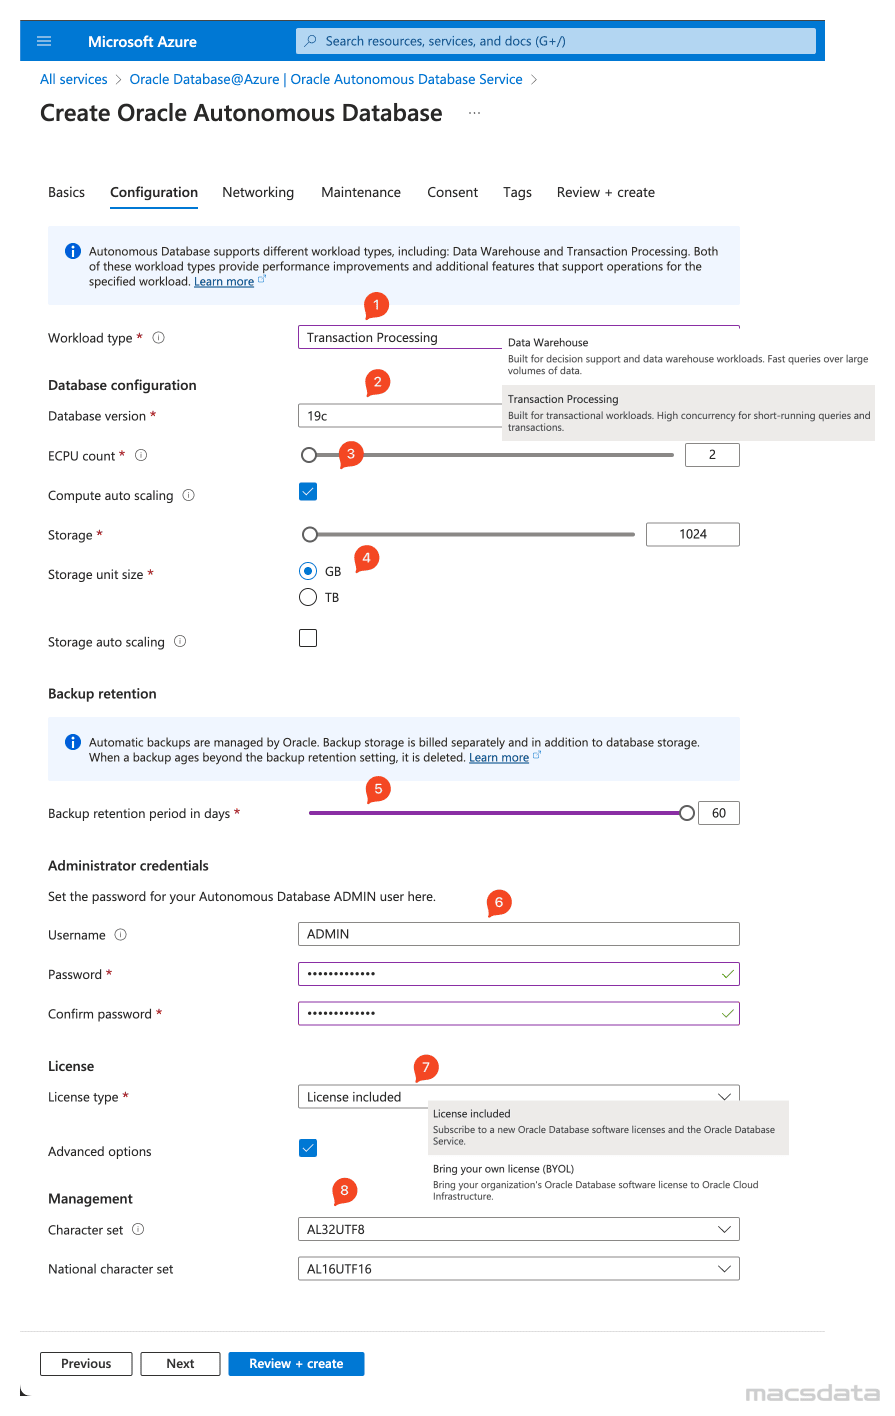
Enter the required information for the Configuration tab:
1. Choose the appropriate Workload type (Data Warehouse or Transaction Processing)
2. Select the Database version
3. Enter the ECPU count and if Compute auto scaling should be enabled
4. Enter the required Storage amount and if Storage auto scaling should be enabled
5. Select the required Backup retention period in days
6. Enter the Administrator password (Username is ADMIN)
7. Select the appropriate License type (License included or Bring your own license)
8. Under Advanced options you can specify the Character set and National character set
-
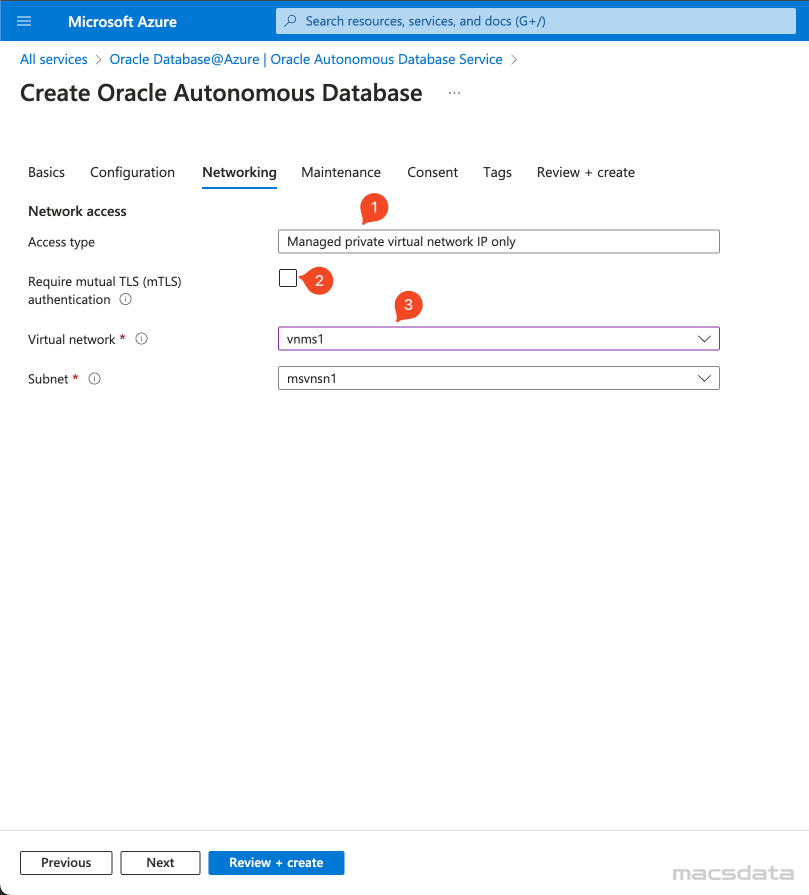
Enter the required information under Networking:
1. For the Access type only Managed private virtual network IP only is supported
2. Select this option if the ADB requires mutual TLS authentication (wallet only)
3. Specify the Virtual network and the Subnet
If your subnet is not listed in the drop down menu make sure it is delegated to Oracle.Database/networkAttachments.
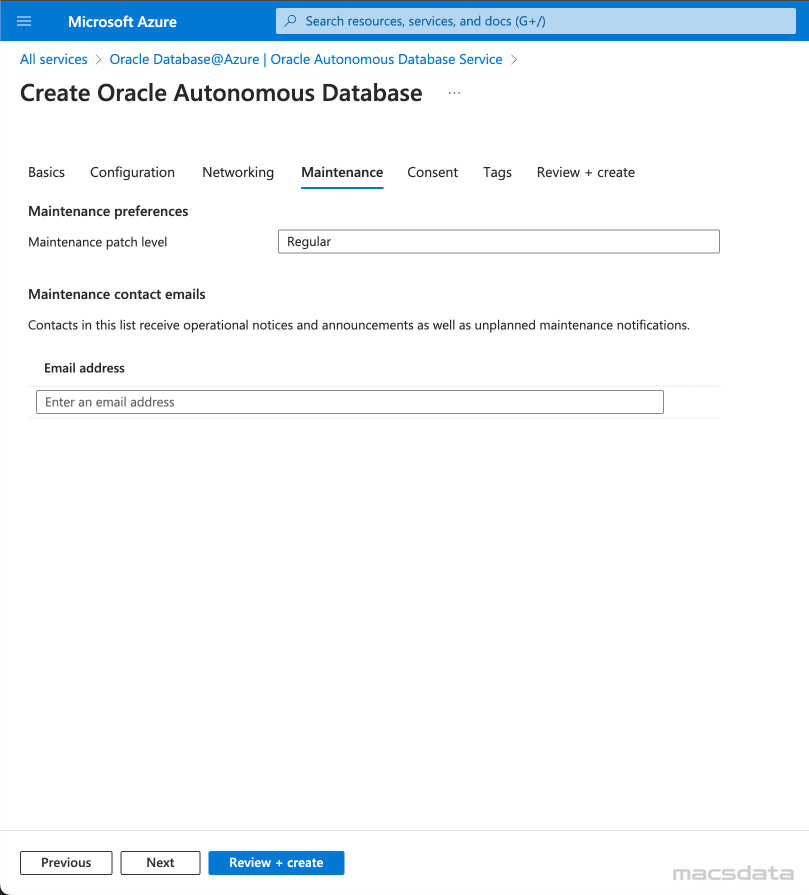
- In the next tab you can specifiy Maintenance related settings
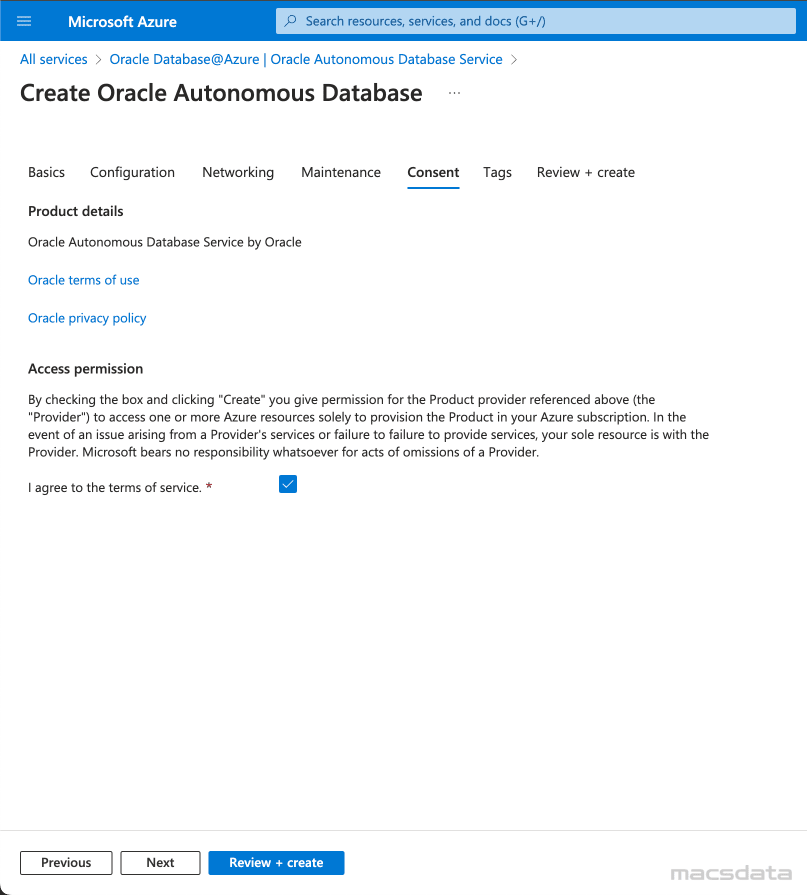
- You need to agree to the terms of service
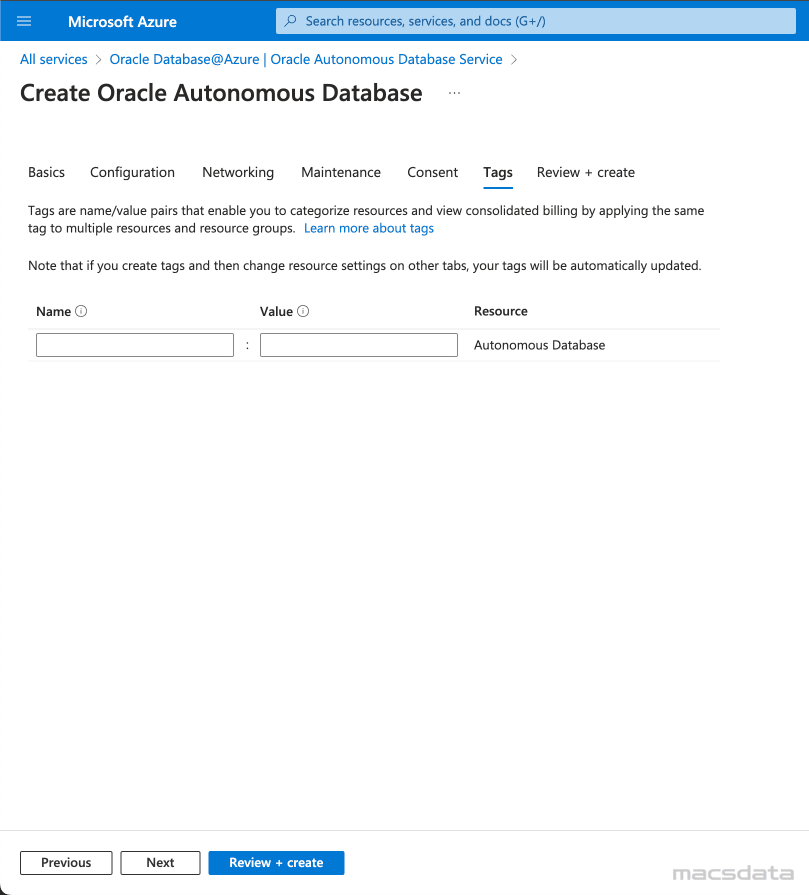
- If required you can specify Tags for the Autonomous Database
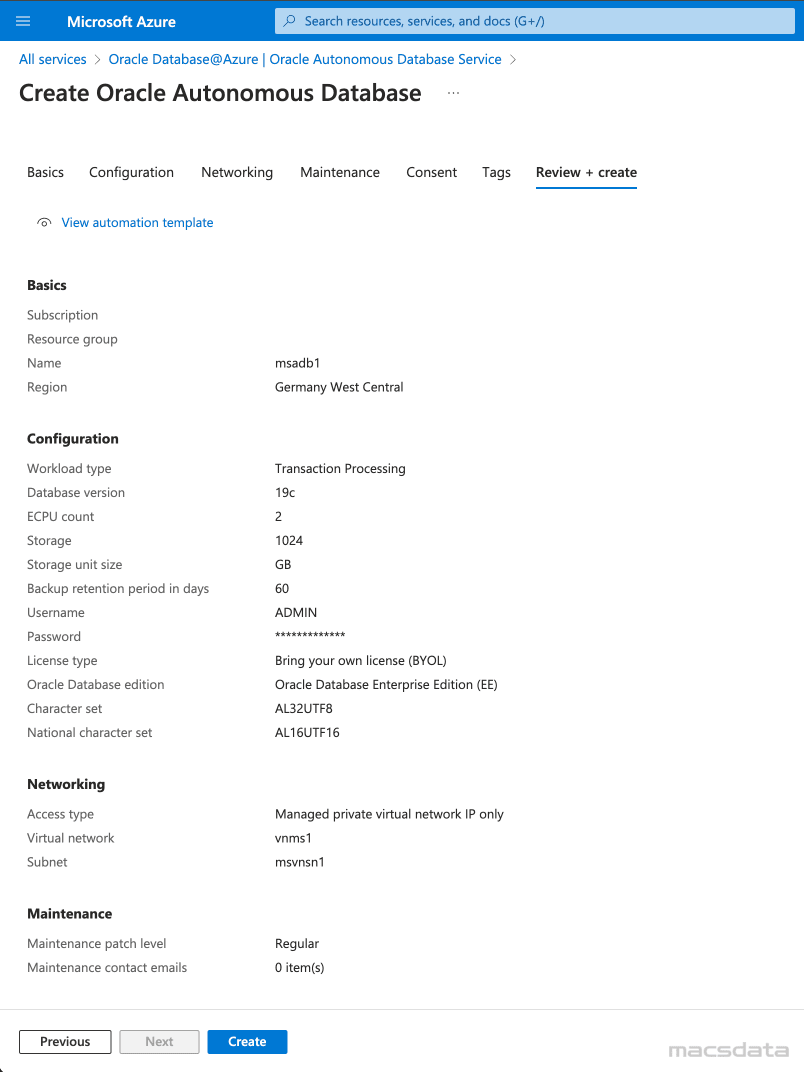
- The Review + create tab shows a summary of the configuration
- Click Create to deploy the ADB. This will take a few minutes
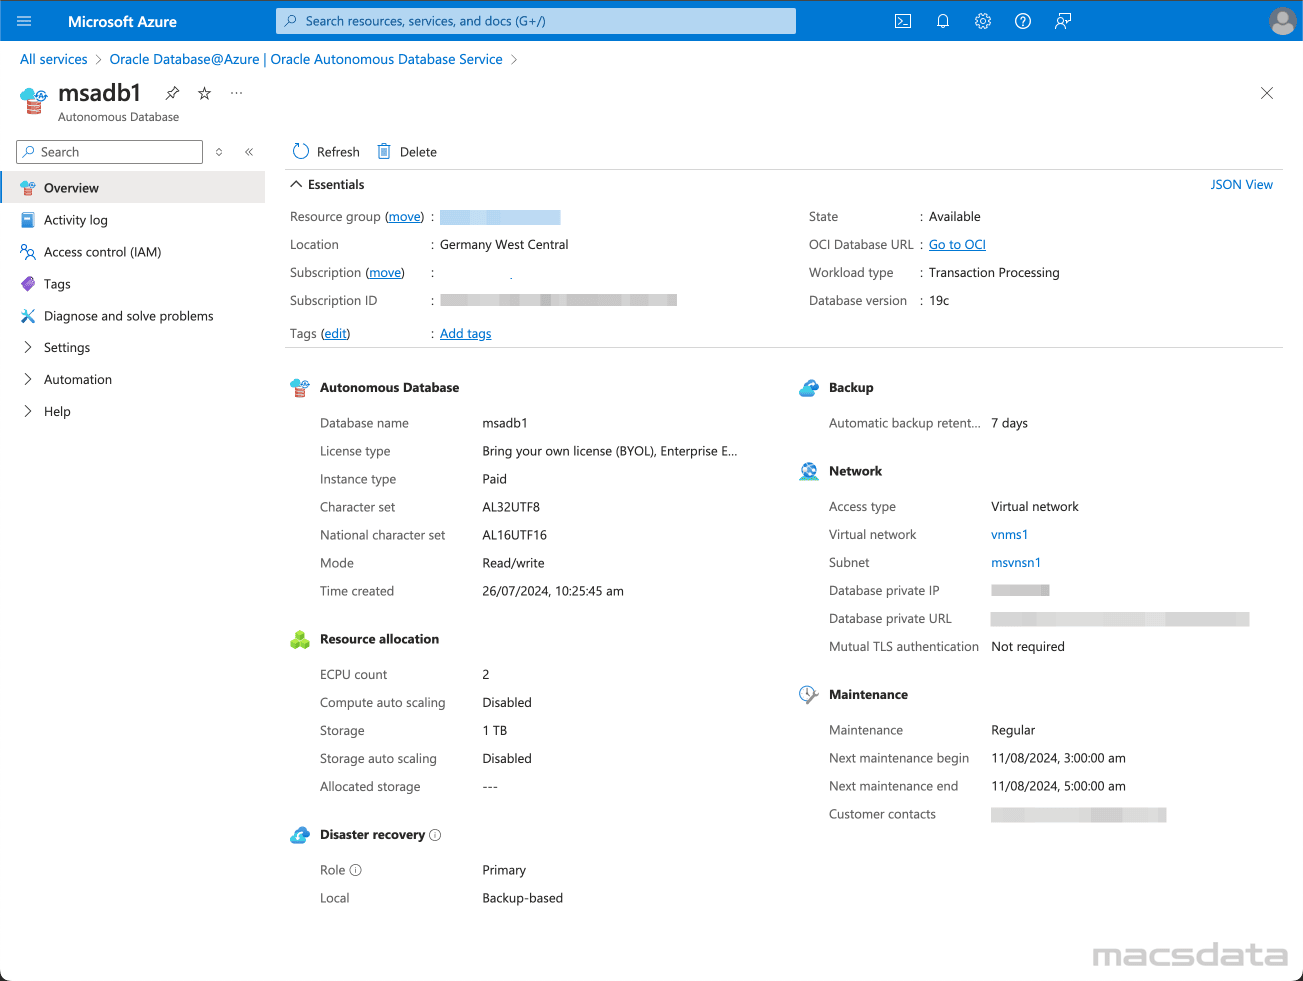
- After the deployment is complete you will find the provisioned database under Oracle Autonomous Database Service
- Click on the database to open the overview page that shows more detailed information about the Autonomous Database
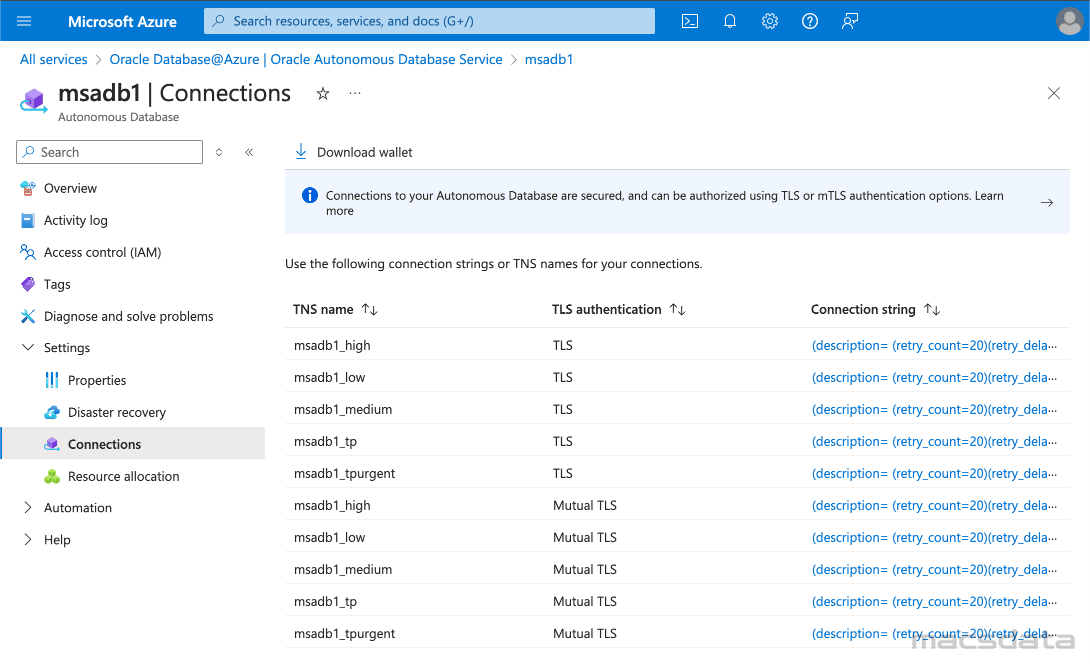
- Click on Settings and then Connections
- This shows a list of all the database services and their Connection string
- For the best import performance to ADB use the _high service
- Choose the MTLS connection if you want to connect with a wallet file
Blob storage
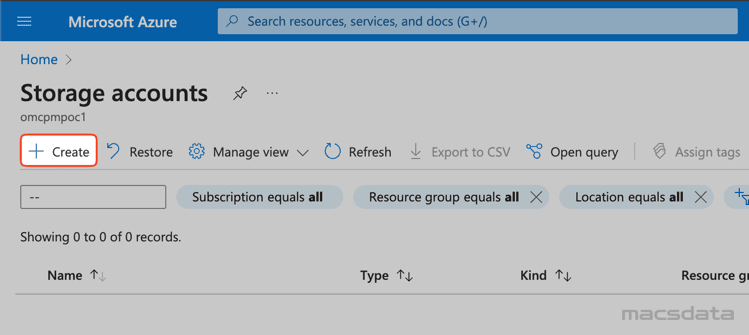
Here are the steps to provision the Azure storage account and Blob storage container:
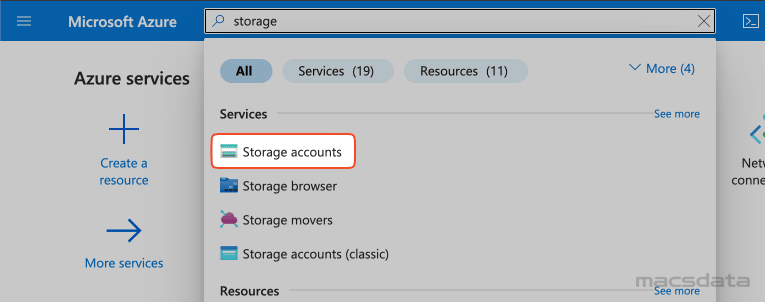
- Enter
storagein the search field and select the Storage accounts service
- Click on Create to provision a new storage account
-
Enter the required information under Basics:
1. Select the correct Subscription
2. Select the Resource group
3. Enter the Name of the storage account
4. Select the Region
5. Choose the required Performance (Standard or Premium)
6. Choose the required Redundancy. In this example we use Locally-redundant storage because it's not critical and we don't need any redundancy

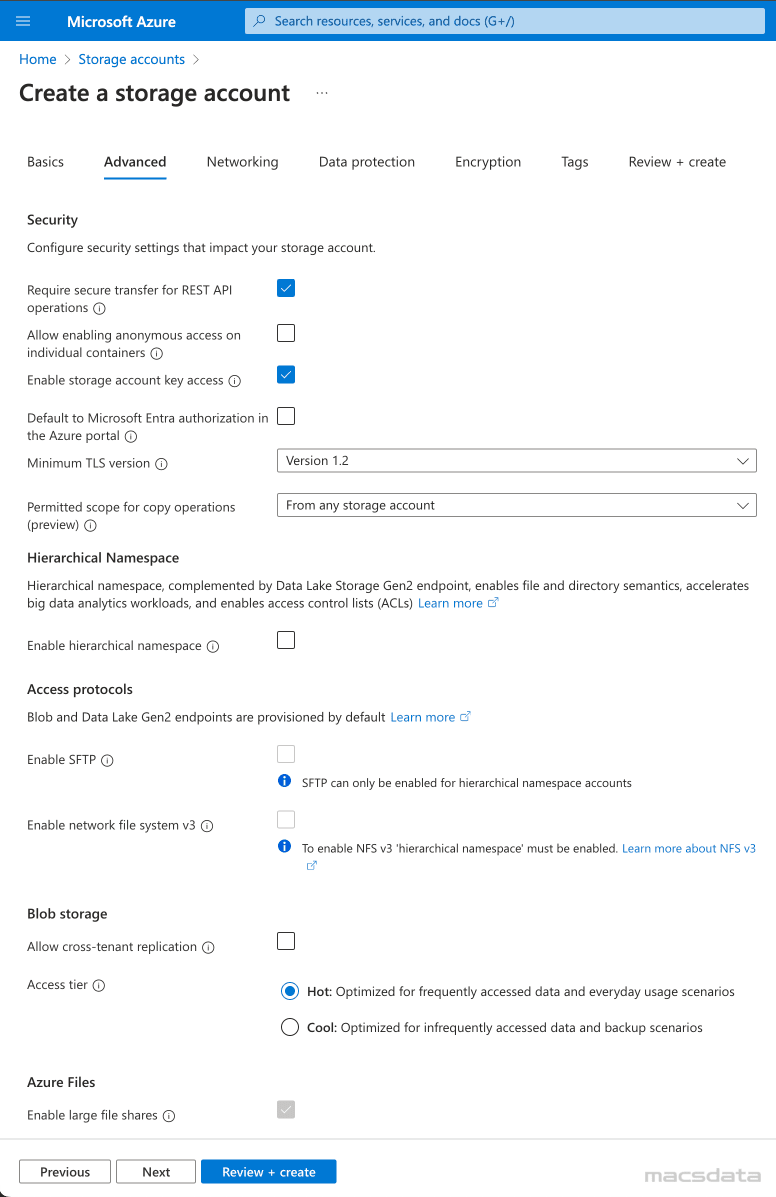
- In the next tab you can specify additional Advanced settings especially for security
- We will use the default settings here in our example
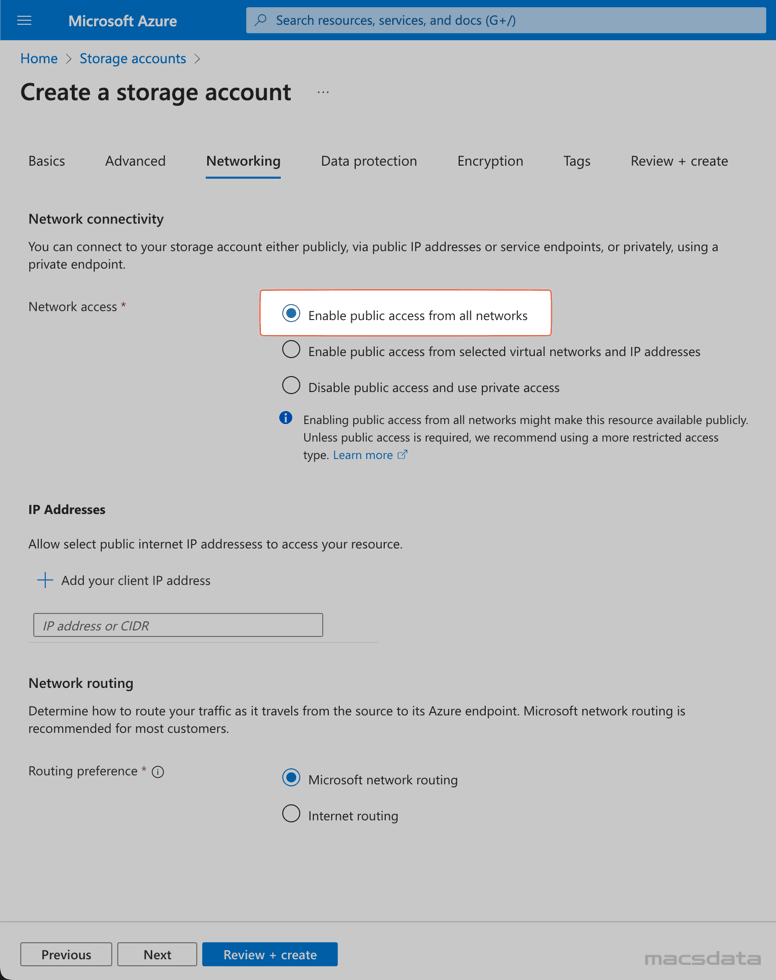
- Under Networking select Enable public access from all networks
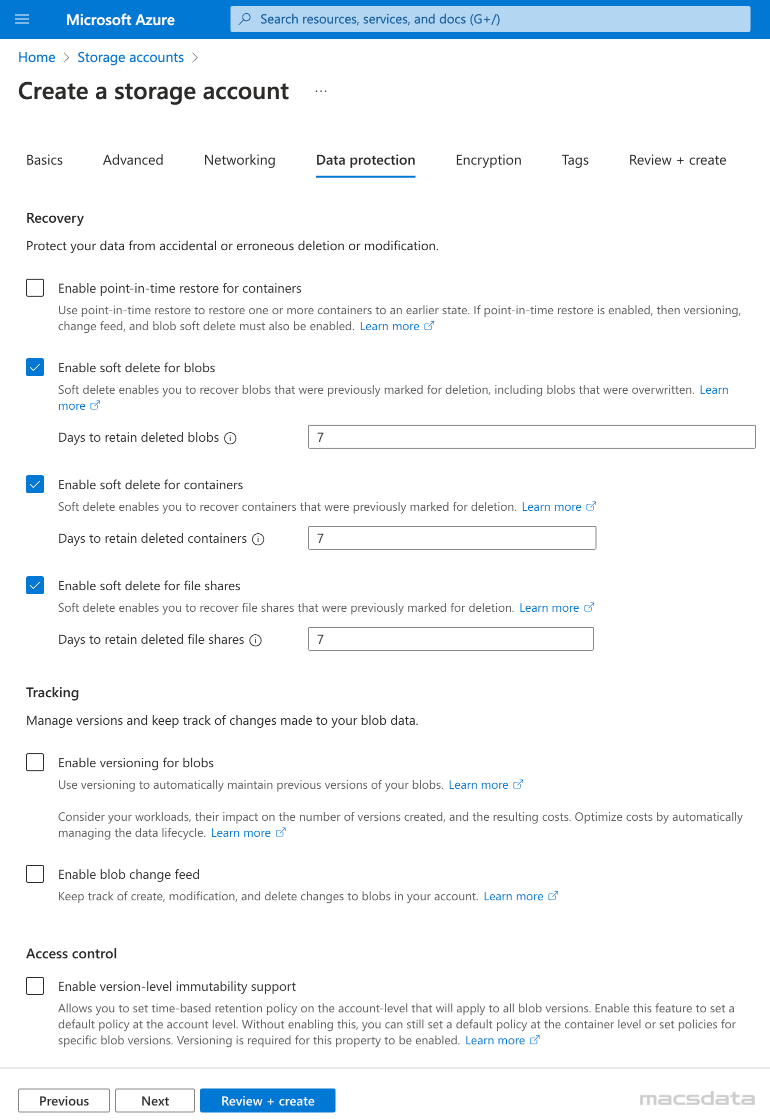
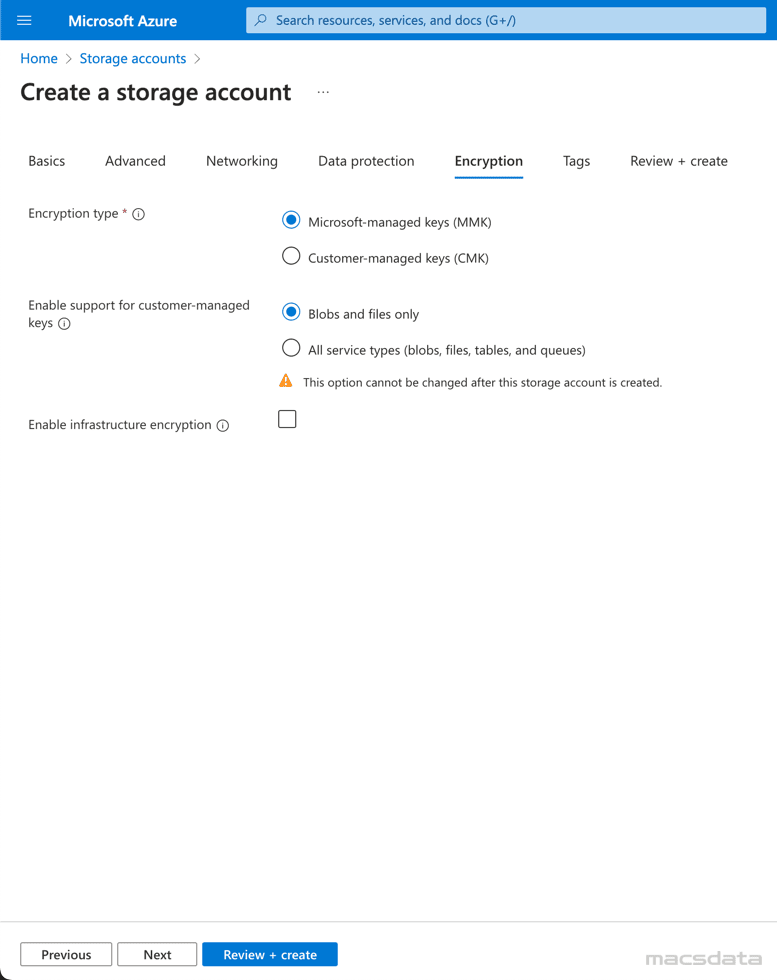
- In our example we will use the default settings under Data protection
- Again we will use the default settings under Encryption
- If required you can specify Tags for the storage account
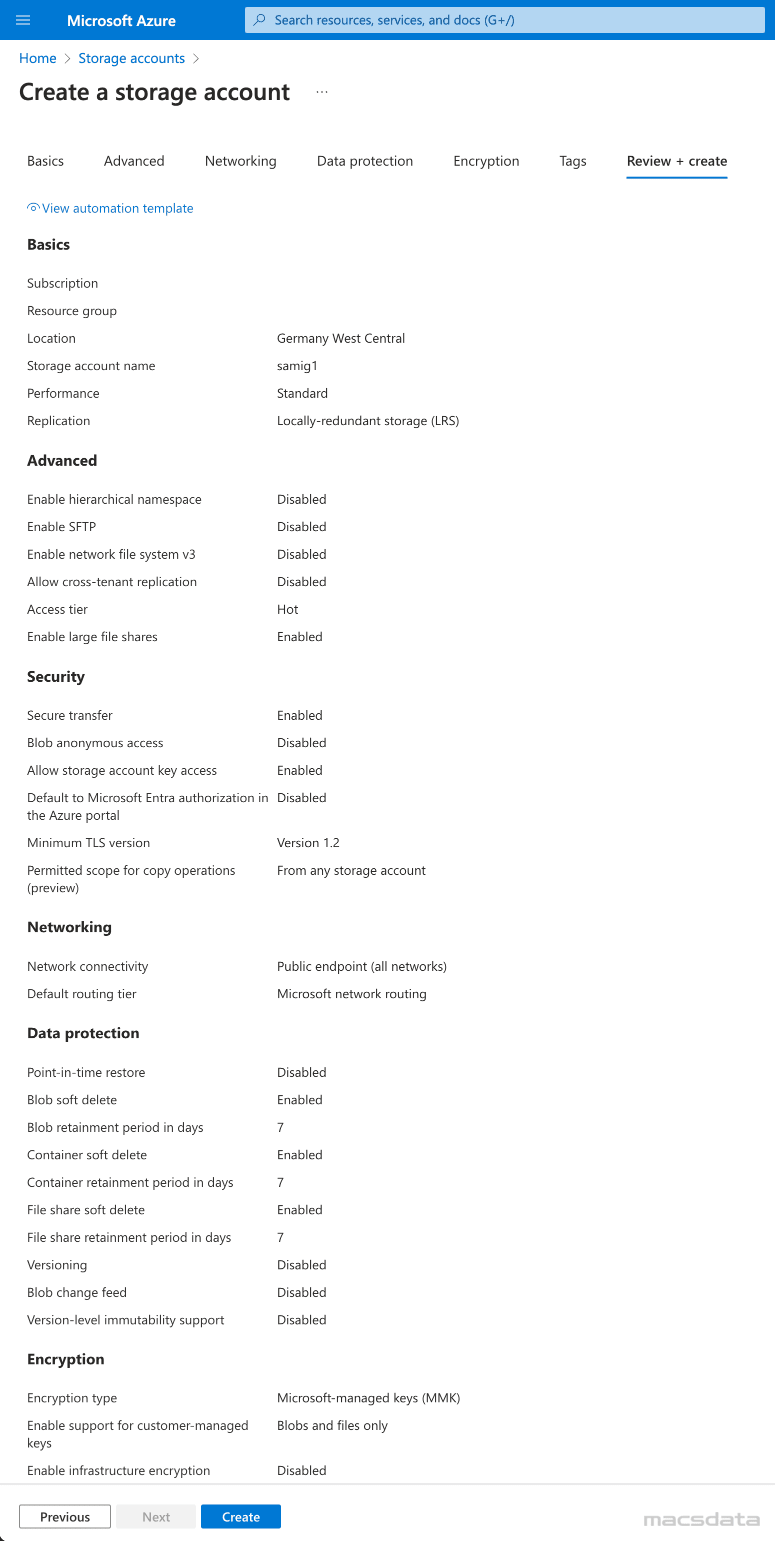
- The Review + create tab shows a summary of the configuration
Click Create to provision the storage account. This will take a few minutes
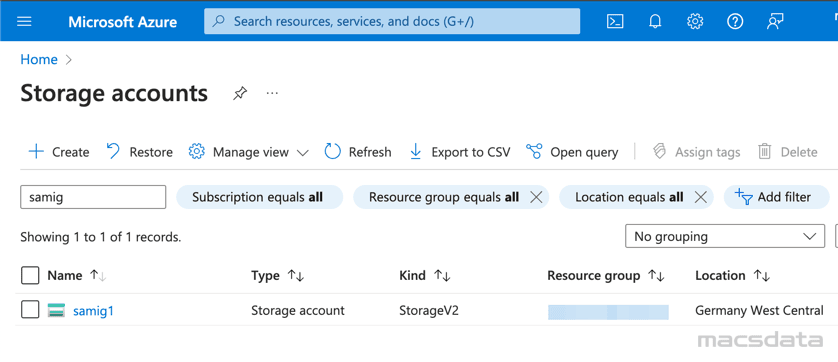
- After the deployment is complete the new resource is shown under storage accounts
- Click on the storage account
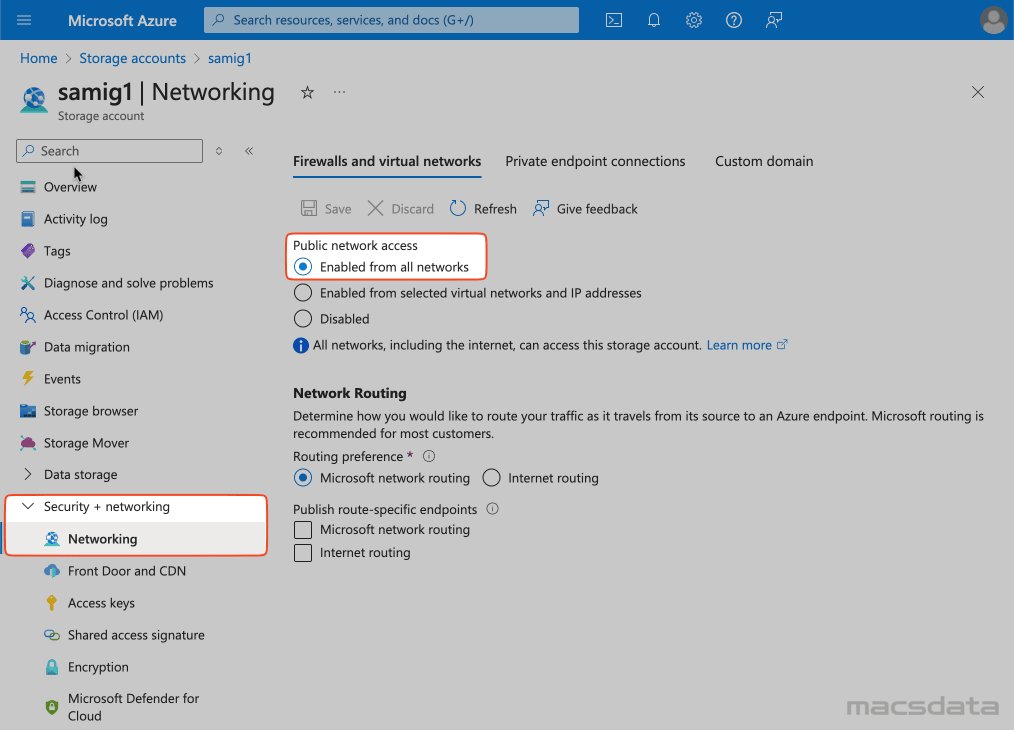
- Select Networking under Security + networking
- Verify again that public network access is activated with Enabled from all networks
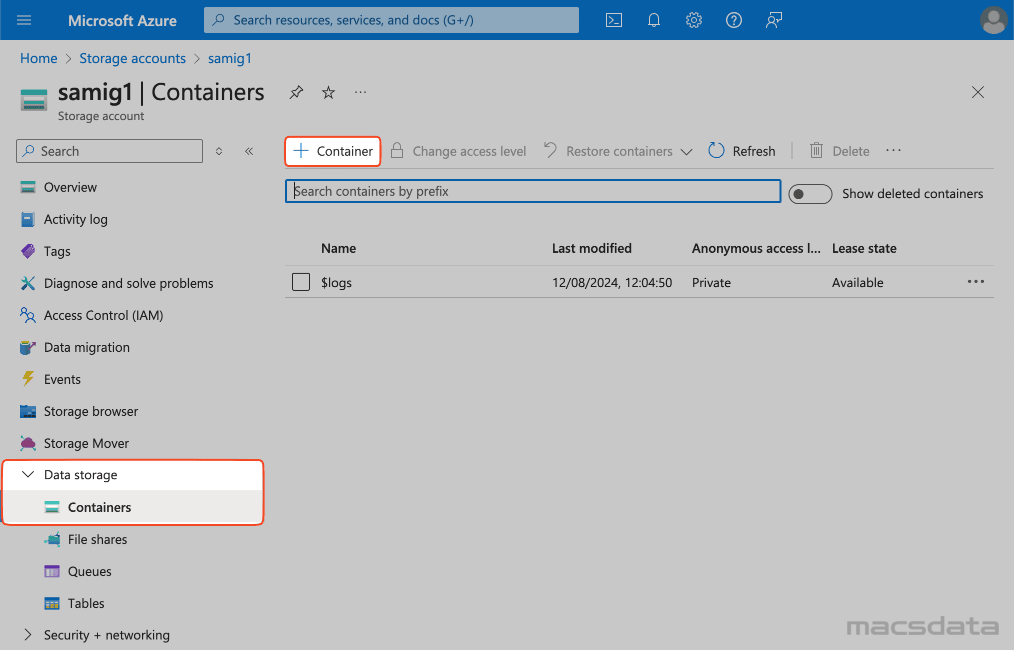
- To create a new container click on Containers under Data storage
- Click the + Container
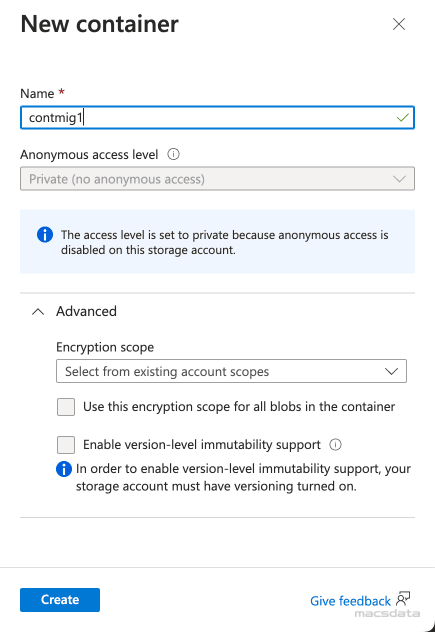
- Add the required container Name information
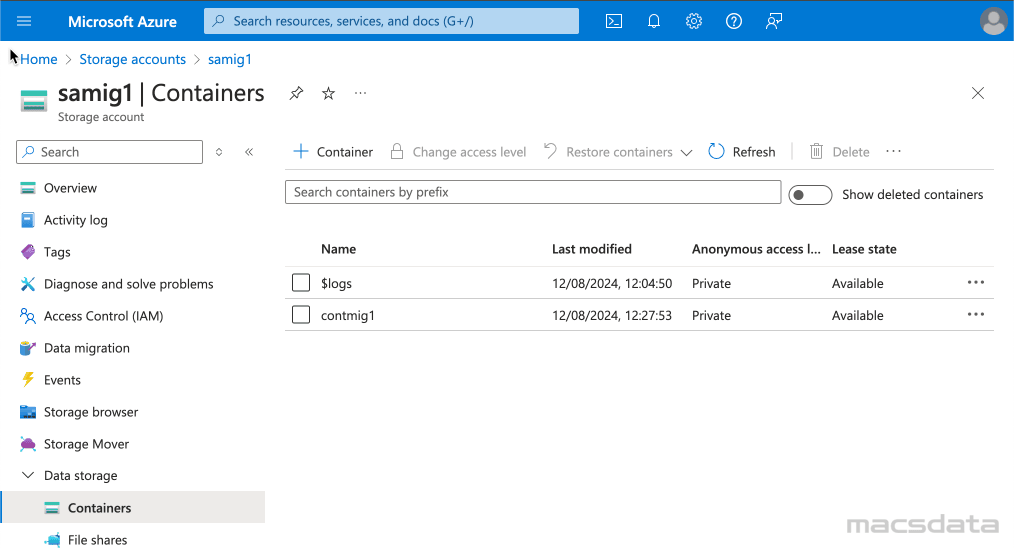
- The new container is now listed under Containers
Dumpfile Upload
In this example we will use the Azure web interface to upload the dumpfile to the container. You can also use other tools like Azure cli or curl to perform the upload. Especially for larger and multiple files this would probably be a better option.
To upload the dumpfile to the newly created storage container via the Azure web interface:
- Click on the container and then click on Upload
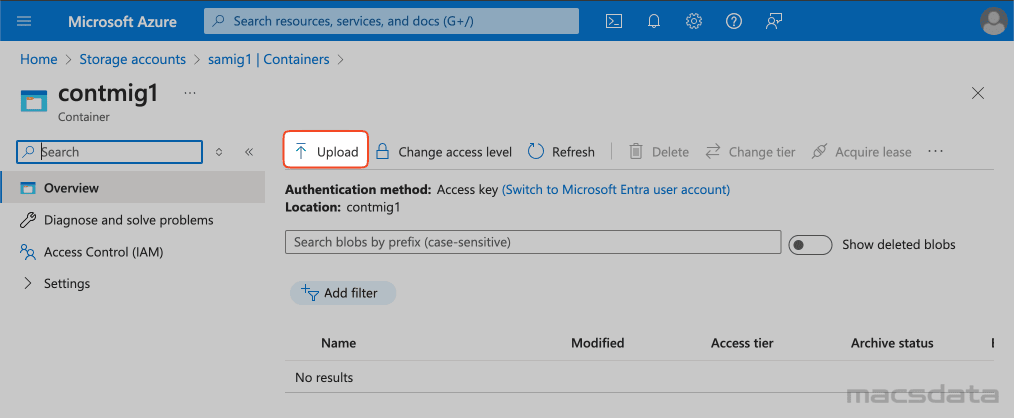
- Here you can specify one or multiple files to upload to the container
- In our example we use a small HR schema dumpfile (HR.DMP) which was exported from the source database

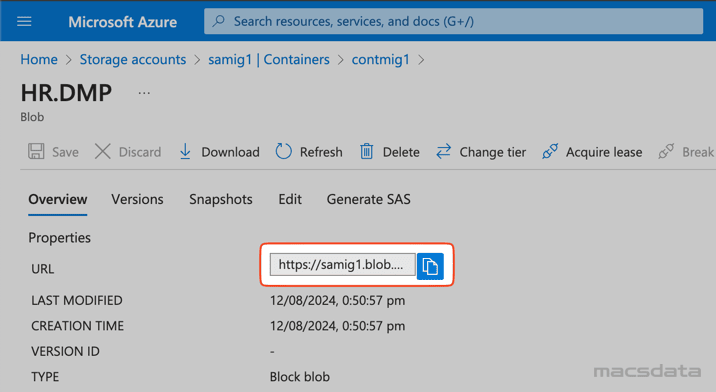
- After the file is uploaded click on the three dots on the right side and select Properties
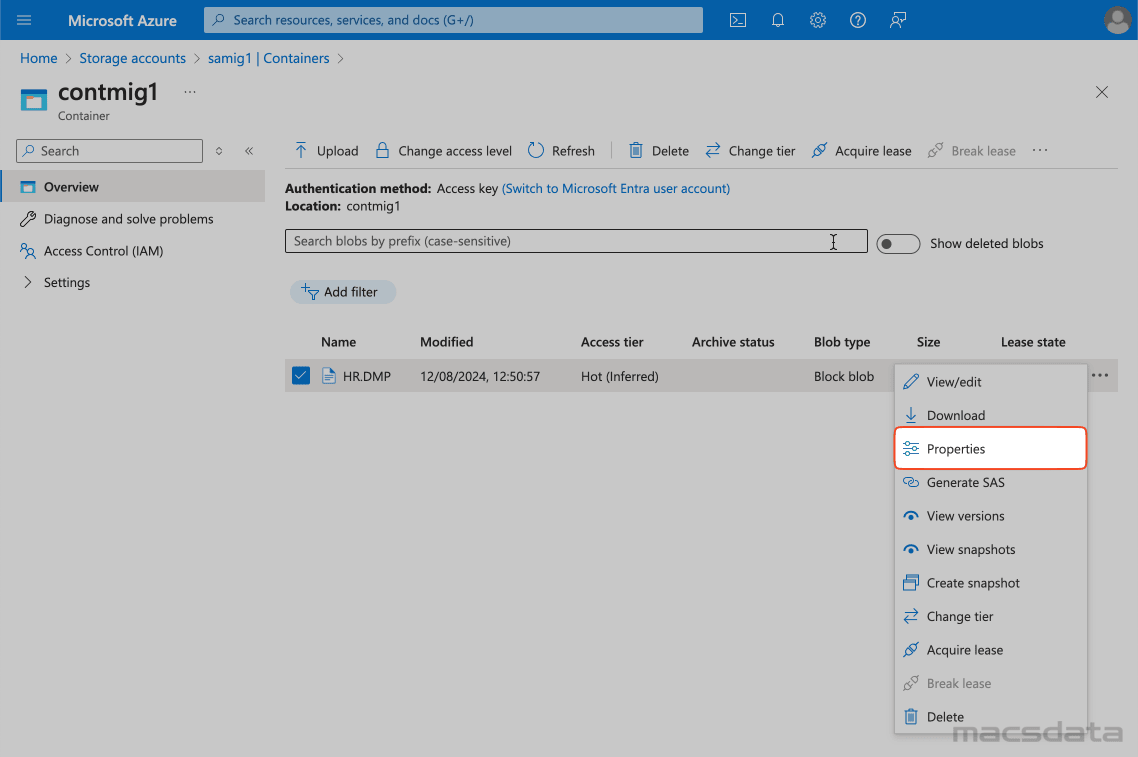
- Copy the URL path for the uploaded file. This will be used later when we test the credential and create the Data Pump parameterfile
Migration - Data Import
1. Create Credential
To access the Blob storage from the Autonomous Database we need to create a credential first.
For this we need a username and password to access the dumpfiles on the storage container:
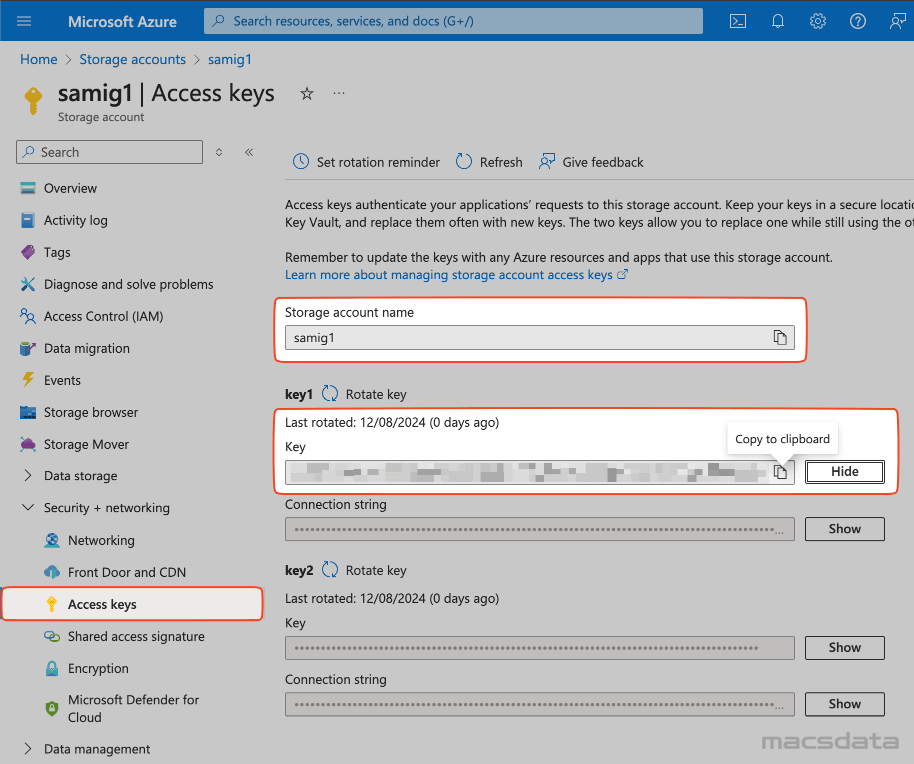
- Navigate to the storage account in Azure
- Select Access keys under Security + networking
- Copy the Storage account name (this is the username)
- Copy the key (this is the password)
- Click on Show and copy the key
- Now login with ADMIN to the Autonomous Database and execute
DBMS_CLOUD.CREATE_CREDENTIAL- Specify a
credential_name - For the
usernameuse the copied Storage account name - For the
passworduse the copied key
- Specify a
BEGIN
  DBMS_CLOUD.CREATE_CREDENTIAL(
    credential_name => 'BLOBCRED',
    username => 'samig1',
    password => '<password/key>'
  );
END;
/
2. Verify Credential
- To test if we can access the object storage we execute
DBMS_CLOUD.LIST_OBJECTSwith the credential and URL to list the files in the container- As URL we use the path that we copied before as the last step in the Dumpfile Upload section
- Make sure to delete the filename at the end of the URL. So in our example instead of
https://samig1.blob.core.windows.net/contmig1/HR.DMPwe usehttps://samig1.blob.core.windows.net/contmig1/
col object_name format a15
col checksum format a25
col created format a35
col last_modified format a35
set lines 200

SELECT * FROM DBMS_CLOUD.LIST_OBJECTS('BLOBCRED','https://samig1.blob.core.windows.net/contmig1/');
- We can see our dumpfile that we uploaded to the container in a previous step
OBJECT_NAME          BYTES CHECKSUM                  CREATED                          LAST_MODIFIED
--------------- ---------- ------------------------- -------------------------------- --------------------------------
HR.DMP              270336 SOD+SWekgBXXJ+XyxUvcaQ==  12-AUG-24 10.50.57.000000 AM GMT 12-AUG-24 10.50.57.000000 AM GMT
Checking file integrity with MD5 Checksum
To check the file integrity you can generate a checksum for the uploaded files on the source and compare it with the checksum of the files stored on Blob storage.
In Azure Blob Storage, the MD5 hash is stored in a different format than what you typically get from running tools like md5sum or openssl. Azure uses a Base64-encoded version of the binary MD5 hash, whereas local tools usually output the hash in a hexadecimal format. That's why we need to go through some extra steps to convert the hex to binary and then Base64 encoding it.
Below you will find the different commands to generate the output that should match the checksum in Azure.
openssl dgst -md5 -binary HR.DMP | base64
md5sum HR.DMP | awk '{print $1}' | xxd -r -p | base64
md5 -r HR.DMP | awk '{print $1}' | xxd -r -p | base64
3. Parameter File
On a compute that has an Oracle client installed and access to the Autonomous Database we will now create the parameter file for the import.
In case you use the Instant Client make sure to also install the Tools Package which includes the Data Pump client.
If you want to execute the import directly from the databasee skip the next 2 steps and continue with Alternative: API.
Create a Data Pump parameter file imp.par with the following parameters:
- Specify the credential we created before in the
CREDENTIALSparameter - Specify the URL in the
DUMPFILEparameter - In our example we run the import with 1 worker because we only import a few small tables. To speed up the import process you can increase the CPUs of the ADB and use more workers to run the import in parallel
- For more information and other parameters have a look at Data Pump Import Best Practices
DIRECTORY=DATA_PUMP_DIR
SCHEMAS=HR
REMAP_TABLESPACE=%:DATA
CREDENTIAL=BLOBCRED
PARALLEL=1
DUMPFIlE=https://samig1.blob.core.windows.net/contmig1/HR.DMP
LOGFILE=blobimp.log
EXCLUDE=cluster,indextype,db_link
METRICS=y
LOGTIME=all
If your export was created with parallel settings and multiple dumpfiles use %L when specifying the DUMPFILE parameter:
DUMPFIlE=https://mssa1.blob.core.windows.net/mscont1/HR%L.DMP
4. Import
- Start the Data Pump import with the previous configured parameterfile
- For best performance use the _high connection to the ADB:
- For larger dumpfiles run the import with
nohupand in the background - Use
tail -f imp.outto monitor the output file and progress
nohup impdp userid=ADMIN/<password>@msadb1_high parfile=imp.par >imp.out 2>&1 &
Output
Import: Release 23.0.0.0.0 - for Oracle Cloud and Engineered Systems on Tue Aug 13 08:00:40 2024
Version 23.5.0.24.07

Copyright (c) 1982, 2024, Oracle and/or its affiliates.  All rights reserved.
Password:

Connected to: Oracle Database 19c Enterprise Edition Release 19.0.0.0.0 - Production
13-AUG-24 08:00:56.679: W-1 Startup on instance 5 took 1 seconds
13-AUG-24 08:00:57.749: W-1 Master table "ADMIN"."SYS_IMPORT_FULL_01" successfully loaded/unloaded
13-AUG-24 08:00:58.899: Starting "ADMIN"."SYS_IMPORT_FULL_01":  userid=ADMIN/********@msadb1_high parfile=imp.par
13-AUG-24 08:00:58.932: W-1 Processing object type SCHEMA_EXPORT/USER
13-AUG-24 08:00:59.328: W-1      Completed 1 USER objects in 1 seconds
13-AUG-24 08:00:59.328: W-1 Processing object type SCHEMA_EXPORT/SYSTEM_GRANT
13-AUG-24 08:00:59.393: W-1      Completed 7 SYSTEM_GRANT objects in 0 seconds
13-AUG-24 08:00:59.393: W-1 Processing object type SCHEMA_EXPORT/ROLE_GRANT
13-AUG-24 08:00:59.459: W-1      Completed 1 ROLE_GRANT objects in 0 seconds
13-AUG-24 08:00:59.459: W-1 Processing object type SCHEMA_EXPORT/DEFAULT_ROLE
13-AUG-24 08:00:59.513: W-1      Completed 1 DEFAULT_ROLE objects in 0 seconds
13-AUG-24 08:00:59.513: W-1 Processing object type SCHEMA_EXPORT/TABLESPACE_QUOTA
13-AUG-24 08:00:59.595: W-1      Completed 1 TABLESPACE_QUOTA objects in 0 seconds
13-AUG-24 08:00:59.595: W-1 Processing object type SCHEMA_EXPORT/PASSWORD_HISTORY
13-AUG-24 08:00:59.663: W-1      Completed 1 PASSWORD_HISTORY objects in 0 seconds
13-AUG-24 08:00:59.663: W-1 Processing object type SCHEMA_EXPORT/PRE_SCHEMA/PROCACT_SCHEMA
13-AUG-24 08:00:59.828: W-1      Completed 1 PROCACT_SCHEMA objects in 0 seconds
13-AUG-24 08:00:59.828: W-1 Processing object type SCHEMA_EXPORT/SEQUENCE/SEQUENCE
13-AUG-24 08:00:59.943: W-1      Completed 3 SEQUENCE objects in 0 seconds
13-AUG-24 08:00:59.943: W-1 Processing object type SCHEMA_EXPORT/TABLE/TABLE
13-AUG-24 08:01:01.450: W-1      Completed 7 TABLE objects in 2 seconds
13-AUG-24 08:01:01.463: W-1 Processing object type SCHEMA_EXPORT/TABLE/TABLE_DATA
13-AUG-24 08:01:03.307: W-1 . . imported "HR"."EMPLOYEES"                            8.765 KB     107 rows in 1 seconds using external_table
13-AUG-24 08:01:04.114: W-1 . . imported "HR"."LOCATIONS"                            6.062 KB      23 rows in 1 seconds using external_table
13-AUG-24 08:01:04.195: W-1 . . imported "HR"."JOB_HISTORY"                          5.304 KB      10 rows in 0 seconds using external_table
13-AUG-24 08:01:04.426: W-1 . . imported "HR"."JOBS"                                 5.437 KB      19 rows in 0 seconds using external_table
13-AUG-24 08:01:04.554: W-1 . . imported "HR"."DEPARTMENTS"                          5.437 KB      27 rows in 0 seconds using external_table
13-AUG-24 08:01:04.797: W-1 . . imported "HR"."COUNTRIES"                            5.226 KB      25 rows in 0 seconds using external_table
13-AUG-24 08:01:04.956: W-1 . . imported "HR"."REGIONS"                              4.851 KB       4 rows in 0 seconds using external_table
13-AUG-24 08:01:04.968: W-1 Processing object type SCHEMA_EXPORT/TABLE/COMMENT
13-AUG-24 08:01:05.080: W-1      Completed 39 COMMENT objects in 1 seconds
13-AUG-24 08:01:05.080: W-1 Processing object type SCHEMA_EXPORT/PROCEDURE/PROCEDURE
13-AUG-24 08:01:05.157: W-1      Completed 2 PROCEDURE objects in 0 seconds
13-AUG-24 08:01:05.157: W-1 Processing object type SCHEMA_EXPORT/PROCEDURE/ALTER_PROCEDURE
13-AUG-24 08:01:05.581: W-1      Completed 2 ALTER_PROCEDURE objects in 0 seconds
13-AUG-24 08:01:05.581: W-1 Processing object type SCHEMA_EXPORT/VIEW/VIEW
13-AUG-24 08:01:05.768: W-1      Completed 1 VIEW objects in 0 seconds
13-AUG-24 08:01:05.794: W-1 Processing object type SCHEMA_EXPORT/TABLE/INDEX/INDEX
13-AUG-24 08:01:06.583: W-1      Completed 17 INDEX objects in 1 seconds
13-AUG-24 08:01:06.583: W-1 Processing object type SCHEMA_EXPORT/TABLE/CONSTRAINT/CONSTRAINT
13-AUG-24 08:01:06.838: W-1      Completed 9 CONSTRAINT objects in 0 seconds
13-AUG-24 08:01:06.838: W-1 Processing object type SCHEMA_EXPORT/TABLE/INDEX/STATISTICS/INDEX_STATISTICS
13-AUG-24 08:01:06.859: W-1      Completed 19 INDEX_STATISTICS objects in 0 seconds
13-AUG-24 08:01:06.859: W-1 Processing object type SCHEMA_EXPORT/TABLE/CONSTRAINT/REF_CONSTRAINT
13-AUG-24 08:01:07.087: W-1      Completed 10 REF_CONSTRAINT objects in 1 seconds
13-AUG-24 08:01:07.087: W-1 Processing object type SCHEMA_EXPORT/TABLE/TRIGGER
13-AUG-24 08:01:07.200: W-1      Completed 2 TRIGGER objects in 0 seconds
13-AUG-24 08:01:07.200: W-1 Processing object type SCHEMA_EXPORT/TABLE/STATISTICS/TABLE_STATISTICS
13-AUG-24 08:01:07.220: W-1      Completed 7 TABLE_STATISTICS objects in 0 seconds
13-AUG-24 08:01:07.220: W-1 Processing object type SCHEMA_EXPORT/STATISTICS/MARKER
13-AUG-24 08:01:07.241: W-1      Completed 1 MARKER objects in 0 seconds
13-AUG-24 08:01:07.263: W-1      Completed 7 SCHEMA_EXPORT/TABLE/TABLE_DATA objects in 3 seconds
13-AUG-24 08:01:09.045: Job "ADMIN"."SYS_IMPORT_FULL_01" successfully completed at Tue Aug 13 08:01:07 2024 elapsed 0 00:00:15
You can query the DBA_DATAPUMP_JOBS view to get more information about the currently executing job.
Alternative: API
As an alternative in case you don't have access to a compute with an installed Data Pump client it is also possible to execute the import directly from the database with the Data Pump API DBMS_DATAPUMP.
While DBMS_DATAPUMP offers many options and is powerful for advanced use cases, the Data Pump client is generally simpler and more straightforward, especially for less experienced users.
- The following code snippet shows an example how to execute the import with
DBMS_DATAPUMP - We specify the same parameters like in the parameterfile from the previous step
- Check the documentation for more details about the individual
DBMS_DATAPUMPprocedures and functions
SET SERVEROUTPUT ON
SET TIMING ON

DECLARE
  l_job_handle      NUMBER;
  l_job_name        VARCHAR2(32);
  l_job_state       VARCHAR2(64);
  l_data_pump_dir   VARCHAR2(32)  := 'DATA_PUMP_DIR';
  l_dump_file_name  VARCHAR2(64)  := 'https://samig1.blob.core.windows.net/contmig1/HR.DMP';
  l_credential_name VARCHAR2(32)  := 'BLOBCRED';
  l_parallel        NUMBER        := 1;
BEGIN
  -- Create a unique job name
  l_job_name := DBMS_SCHEDULER.GENERATE_JOB_NAME(
    prefix  => 'import_job'
  );

  -- Open a new Data Pump job
  l_job_handle := DBMS_DATAPUMP.OPEN(
    operation   => 'IMPORT',
    job_mode    => 'SCHEMA',
    job_name    => l_job_name
  );

  -- Add the source dump file
  DBMS_DATAPUMP.ADD_FILE(
    handle    => l_job_handle,
    filename  => l_dump_file_name,
    directory => l_credential_name,
    filetype  => DBMS_DATAPUMP.KU$_FILE_TYPE_URIDUMP_FILE
  );

  -- Add the logfile
  DBMS_DATAPUMP.ADD_FILE(
    handle    => l_job_handle,
    filename  => 'blobimp.log',
    directory => l_data_pump_dir,
    filetype  => DBMS_DATAPUMP.KU$_FILE_TYPE_LOG_FILE
  );

  -- Parallel settings
  DBMS_DATAPUMP.SET_PARALLEL(
    handle    => l_job_handle,
    degree    => l_parallel
  );

  -- Specify additional parameters as needed
  DBMS_DATAPUMP.SET_PARAMETER(
    handle => l_job_handle,
    name   => 'LOGTIME',
    value  => 'ALL'
  );

  DBMS_DATAPUMP.SET_PARAMETER(
    handle => l_job_handle,
    name   => 'METRICS',
    value  =>  1
  );

  -- Remap Tablespaces
  DBMS_DATAPUMP.METADATA_REMAP(
    handle    => l_job_handle,
    name      => 'REMAP_TABLESPACE',
    old_value => '%',
    value     => 'DATA'
  );

  -- Specify the schemas
  DBMS_DATAPUMP.METADATA_FILTER(
    handle => l_job_handle,
    name   => 'SCHEMA_LIST',
    value  => '''HR'''
  );

  -- Start the job
  DBMS_DATAPUMP.START_JOB(l_job_handle);

  -- Wait for job to complete
  DBMS_DATAPUMP.WAIT_FOR_JOB(
    handle    => l_job_handle,
    job_state => l_job_state
  );

  -- Output Result
  DBMS_OUTPUT.PUT_LINE('Job '''||l_job_name||''': '||l_job_state);

EXCEPTION
  WHEN OTHERS THEN
    DBMS_DATAPUMP.STOP_JOB(l_job_handle);
    RAISE;
END;
/
Job 'IMPORT_JOB434': COMPLETED

PL/SQL procedure successfully completed.

Elapsed: 00:00:10.52
In our example we use DBMS_DATAPUMP.WAIT_FOR_JOB to wait in the current session for the import to complete.
When importing larger dumpfiles use DBMS_DATAPUMP.DETACH(l_job_handle); to detach the session from the currently running job and not wait for completion.
5. Check Logfile
To check the logfile from the import we need to verify that the file was created and copy it to the storage container to download and review it:
- First we use
DBMS_CLOUD.LIST_FILESto query theDATA_PUMP_DIRto get information about the logfile that was created for the import operation
col object_name format a15
col created format a35
col last_modified format a35
set lines 200

SELECT object_name, created, last_modified FROM DBMS_CLOUD.LIST_FILES('DATA_PUMP_DIR') ORDER BY last_modified DESC;
OBJECT_NAME     CREATED                             LAST_MODIFIED
--------------- ----------------------------------- -----------------------------------
blobimp.log     13-AUG-24 08.17.41.000000 AM +00:00 13-AUG-24 08.17.52.000000 AM +00:00
- Then we use
DBMS_CLOUD.PUT_OBJECTto copy the logfile from theDATA_PUMP_DIRto our storage container
BEGIN
  DBMS_CLOUD.PUT_OBJECT(
    'BLOBCRED',
    'https://samig1.blob.core.windows.net/contmig1/',
    'DATA_PUMP_DIR',
    'blobimp.log');
END;
/
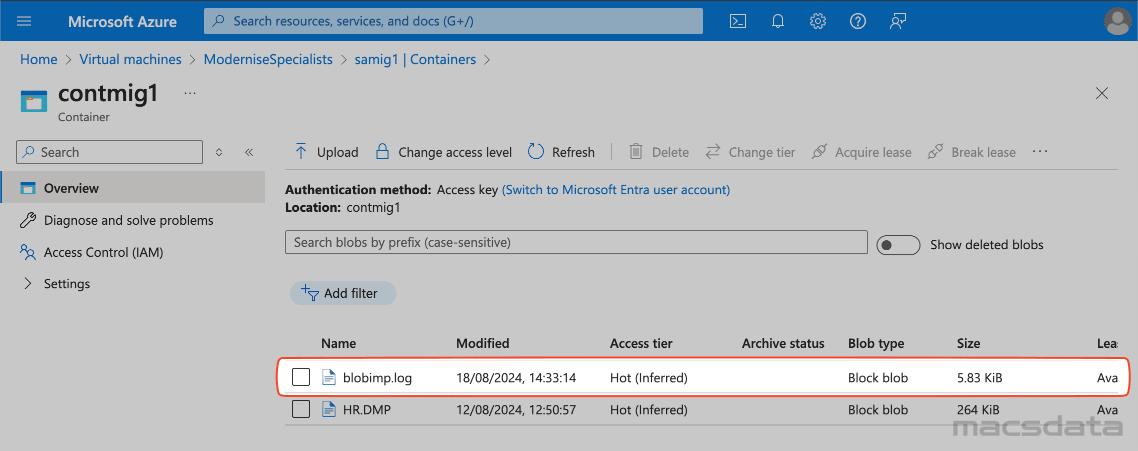
- The file is now visible in our container and we can download and review the logfile
6. Validate
In our example to validate the import we query one of the imported tables:
SQL> SELECT * FROM hr.regions;

 REGION_ID REGION_NAME
---------- -------------------------
	 1 Europe
	 2 Americas
	 3 Asia
	 4 Middle East and Africa
7. Cleanup
- Delete the dumpfiles and logfile from the storage container
- Delete the whole storage container/account if it was only created for the data import
Conclusion
Oracle Autonomous Database@Azure can be easily configured with the DBMS_CLOUD package to access Azure Blob storage. Once the ADB can connect to the storage we can use standard Data Pump impdp command or the Data Pump API (DBMS_DATAPUMP) to import the dumpfile from the storage container into the Autonomous Database.